
THE MARQUEE TOOL

The Marquee tool allows you to select areas in an image. Selection is an important concept in image editing. By selecting specific areas in your image, you can manipulate or modify these areas without affecting the rest of your image. If you click and let your mouse hover over the Marquee icon, you will discover four (4) variations of the marquee: the rectangular marquee for selecting rectangular areas; the elliptical marquee for selecting circular areas; and the single row and column marquees, which allow you to make 1-pixel selections.
THE LASSO TOOL

The Lasso tool is another important selection tool. Unlike the marquee tool, however, the Lasso allows you to control your selections more precisely. You may opt to use any of the following variations:
The Freehand Lasso lets you make a selection by drawing the outline of the object or element. This is very difficult to use. If you’ve got a shaky hand like mine (too much coffee), don’t even attempt to use this.
The Polygonal Lasso gives you more control by selecting the outline point per point. This is advisable for selecting elements with distinct linear or rectangular edges.
The Magnetic Lasso is my personal favorite. It “interprets” your selection by snapping to the border between colors. When you trace the outline of your element, the Magnetic Lasso will cling to the closest pixels of your selection. This is particularly helpful if you’re working on an image with crisp and clear distinctions between pixel colors. However, if your element is a bit blurry around the edges, or if there is no clear distinction between borders, the results may be less than ideal.
Experiment with these three lasso tools until you find the tool that you’re most comfortable with.
THE CROP TOOL

As the name suggests, this tool allows you to crop (or trim) an image. With the Crop Tool as the active tool, you can simply drag your mouse over the area you wish to retain. Upon releasing your mouse, a dashed border will appear on the area you selected. When you click enter, the area outside this border will disappear (or, more appropriately, be cropped out).
THE HEALING BRUSH TOOL

The Healing Brush is a model’s bestfriend. This tool allows you to repair imperfections in a photograph by using either a predefined pattern or a sample from the image itself (e.g., a sample of a person’s skin color, etc.). You can even match the texture, the lighting, or the shading of a photo for the best blending results. Clicking and hovering your mouse over the Healing Brush will reveal the Color Replacement Tool, which replaces certain colors in an image by simply painting over them with acorrective color, and the Red Eye Tool, which removes the reddish tint from pupils with a single click. (Note: I will cover the healing powers of the Healing Brush in succeeding tutorials.)
THE CLONE TOOL

The Clone Stamp Tool takes pixel samples from your image and duplicates (or clones) this sample in the areas of your choice. This tool is particularly useful when erasing a prominent element in your image and trying to make the image look as if nothing’s amiss. Additionally, if your image falls short of your canvas’ dimensions, you can easily “clone” the existing areas and create the illusion of a wider or longer image. To select an area to be cloned, simply press Alt and while holding the key, click on the area to be cloned. The Pattern Stamp Tool, on the other hand, mimics a predefined pattern.
THE ERASER TOOL

As the name suggests, the Eraser Tool erases certain areas on an image. You can define the mode of erasure — i.e., a brush for softer transitions, a block for hard edges, or a pencil as the midpoint. For more advanced usage of the Eraser Tool, check out Editing the Background. The Magic Eraser allows you to “magically” erase similarly colored pixels by first defining a range of colors.
THE BLUR/SHARPEN/SMUDGE TOOLS
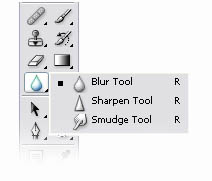
Using the same brushes available in the brush palette, the Blur, Sharpen, and Smudge Tools enable quick fixes in various images. The Blur Tool softens (or blurs) certain areas of an image; the Sharpen Tool sharpens areas and creates clarity; the Smudge Tool pushes colors around in the direction that it is dragged.

THE PATH SELECTION/DIRECT SELECTION TOOLS

If you’re familiar with Adobe Illustrator, you would be familiar with the Path Selection and Direct Selection Tools, both of which are basic tools in vector editing. The Path Selection Tool displays anchor points along a vector path within a specified area, allowing you to modify that path. On the other hand, the Direct Selection Tool allows you to manually adjust individual anchor points within a path.
THE PEN TOOL

The Pen Tool and its variations — Freeform, Add Anchor Point, Delete Anchor Point, and Convert Anchor Point — are used to create and edit vector paths that can be saved as masks or exported into Illustrator. I often use the Pen Tool to create custom shapes and wiggly curves to incorporate in my image. Others use the Pen Tool in making selections within an image.
NOTES AND AUDIO ANNOTATION TOOLS

If you’re working as a group on one project, these tools are particularly helpful. By attaching notes and audio annotations into your canvas, these tools help avoid redundancy, leave instructions for your group, and ensure that proper documentation has been done.
THE HAND TOOL
My personal favorite, the Hand Tool, allows you to navigate your image in Zoom mode by dragging your image around the document window. It is important to understand that the Hand does not move your image across your canvas; it merely shifts the position of your image relative to the window through which you are viewing it. Think of it in terms of viewing a large photograph through a small picture frame. To view certain areas of the large photograph, you have to reposition it to fit the limited area of your frame.
THE MOVE TOOL

In contrast to the Hand Tool, the Move Tool actually moves your image relative to your canvas. By using this tool, you can move around selected areas in your image, or even move entire layers without affecting other layers. Using the Move Tool requires a simple click and drag method.
THE MAGIC WAND

The Magic Wand is another important Selection tool. By clicking on a sample, it automatically selects all the pixels with identical or similar colors. Most PhotoShop beginners fall into the trap of relying on the Magic Wand for “magical” results, but note that this is not always effective. The Magic Wand is not always accurate, and its selections never precise. However, this tool is always handy when there are clear distinctions between pixel colors.
THE SLICE/SLICE SELECT TOOLS

Slice and Slice Select define areas in your image where you want to create animations, links, or rollovers. These tools are meant for creating websites within PhotoShop. However, I prefer to build websites outside of PhotoShop so I never really use these tools. When slicing images for html or css placement, I still prefer the Crop tool.
THE BRUSH AND PENCIL TOOLS

The Brush tool allows you to paint freehand brush strokes on your image using a range of brush types and brush sizes that you can easily customize. The Pencil, on the other hand, paints with a slightly harder edge no matter which brush style you use.
THE HISTORY BRUSH AND THE ART BRUSH

The History Brush lets you paint using a previous state of an image. By saving an old snap shot of your original image, you can make changes in your image and later revert certain areas to their original state using the History Brush. The Art History Brush works in like fashion, but utilizes stylized strokes which emulate the strokes and textures of a painting. (Note: I will cover the History Brush and the Art Brush in succeeding tutorials.)
THE PAINT BUCKET TOOL AND THE GRADIENT TOOL

The Paint Bucket fills your canvas or selected areas of your image with a predefined solid color. Your Foreground Color is the active Paint Bucket Color. To change the active color, you simply have to click on the Foreground box and select a new one. The Gradient Tool, on the other hand, fills your canvas or selected areas of your image with a smooth blend of your Foreground and Background Colors.

THE DODGE, BURN, AND SPONGE TOOLS

The Dodge Tool lightens the highlights, midtones, and shadows of your image within a specified range. The Burn Tool is the opposite of Dodge, darkening areas in your image instead. The Sponge Tool, meanwhile, changes the saturation of colors in certain areas of your image.
THE TYPE TOOL
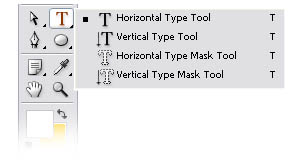
The Type Tool allows you to type text into your image. By default, upon clicking the Type tool and clicking on your image, PhotoShop creates a new separate layer with the text content. The Type Mask Tool and its variations — the Horizontal Type Mask and the Veritical Type Mask — creates a selection in the outlined shape of the text.
RECTANGLES, LINES, AND OTHER CUSTOM SHAPES

You can use this range of tools to create rectangles, rounded rectangles, circular or elliptical shapes, polygons, lines, and other custom shapes. The output of these tools are all vector, but you can easily render each shape individually if needed.
THE EYE DROPPER, COLOR SAMPLER, AND MEASURE TOOLS

The Eye Dropper samples colors from an image (or elsewhere on your screen) to create a new foreground color. The Color Sampler allows you to create saved samples of the color values of an image, sampled from a single pixel. The Measure Tool, meanwhile, calculates the distance between two points anywhere on the work area (the result of which is displayed on the info palette).
THE ZOOM TOOL
Obviously, Zoom allows you to magnify or reduce your current view of the image. In using the Zoom function, I always prefer to use the shortcut keys: press Ctrl with the plus sign (+) for zooming in (to magnify your current view), and Ctrl with the minus sign (-) for zooming out (to reduce your current view).
FOREGROUND AND BACKGROUND
The important thing to remember here is that the Foreground color is always the active color. Coversely, the Background color is your default canvas color - i.e., if you delete certain areas of your background image, the Background color will peek through. You can easily set the color values of your Foreground and Background.
STANDARD MODE VS. QUICK MASK MODE
The Standard Mode is your default view for normal editing. The Quick Mask is a selection tool that allows you to make selections with the brush tool. In Quick Mask Mode, you can paint over the area you wish to select. When you shift to Standard Mode, the areas you’ve filled with color will be automatically selected.
SCREEN MODES
By setting the Screen Mode, you can set the appearance of your workspace. Depending on your preferences, you may work with a full menu bar, a compressed version, or none at all.
JUMP TO IMAGEREADY
The bottommost icon in your Toolbar, this tool launches Imageready, a bitmap graphics editor bundled with the PhotoShop software. Imageready is primarily for editing graphics for web use. I only ever use Imageready when creating animated banner ads. For everything else, I stick with PhotoShop.

No comments:
Post a Comment